Guide
Printing guide
How to print a BinderArt page at exact card size: paper choice, 100% scale settings per system, borderless printing, cutting, the cutting guide sheet and a troubleshooting table.
The file does the hard part: every piece is already laid out at exact card size on an A4 sheet. Printing it well is mostly about not letting the printer help. This guide covers paper, settings, colour, cutting and the cutting guide sheet, and ends with a table for when the pieces do not fit.
Before you start
- The file is a two-page PDF for an A4 sheet (210 x 297 mm): the art on page one, the cutting guide on page two, made to be printed double-sided. Load A4 paper. Letter paper is shorter: an A4 file printed on Letter loses the top and bottom edges of the outer pieces.
- Keep a real card next to you. It is the ruler for everything that follows: 63.5 x 88.9 mm.
- Print one page on plain paper first. It costs a cent and catches every scaling mistake before the photo paper does.
Paper
You want something that lies flat in a pocket, takes colour well and does not glare next to the card itself.
- Matte or satin photo paper, 200 to 250 gsm. The best all-rounder. Deep colour, no fingerprints, similar surface to a card's matte areas.
- Matte cardstock, 200 to 220 gsm. Slightly less saturated than photo paper but very sturdy and cheap. Good for pages that will be handled.
- Glossy photo paper. Avoid. It shows every fingerprint, glares under binder lighting and looks out of place beside a card.
- Plain office paper. For test prints only. Too thin to sit flat and too absorbent for the colours.
Thicker than 250 gsm and the piece starts to stress the pocket, especially if you also sleeve it.
Printer settings
Whatever the system, you are looking for four things: the right paper size, the right paper type, 100% scale and, if your printer offers it, borderless.
Windows
Open the file in Photos or your browser and print. In the print dialog choose your printer, then "More settings" or "Printer properties". Set paper size, set the paper type to photo or heavyweight matte, set scaling to Actual size or 100% (not Fit or Fill), and turn on borderless if listed. Quality: high or photo.
macOS
Open the file in Preview, choose File, then Print. Tick Show Details. Set paper size, untick Scale to Fit and make sure the scale field reads 100%. In the print options pop-up choose Media & Quality to set the paper type and quality, and pick a "borderless" paper size variant if your printer lists one.
iOS and Android
Phones can print, but most mobile print dialogs quietly fit the image to the page and give you no 100% option. If you must, print from a browser rather than the photo app and look for a scale or "actual size" setting. Sending the file to a computer is the reliable path.
Print shops
Ask for "100% scale, no fit-to-page, borderless, A4, matte photo paper". Most shops know exactly what that means. Bring a card so they can check a test piece against it, and the cutting guide if you want them to cut.
Borderless or not?
The file is built full-bleed: the scene runs to the edge of the paper. A borderless printer prints all of it. A printer with a fixed margin (usually 3 to 5 mm) leaves a white strip around the outside and prints everything inside it at the correct size. The pieces still cut to card size and still fit; you just lose a sliver of scenery on the outermost edges. Do not "fit" the image to the printable area to avoid the strip. That shrinks everything and nothing fits.
Colour
- Set the paper type honestly. Telling the printer it has plain paper when it has photo paper starves the print of ink and washes out the darks.
- Turn off any "auto enhance" or "vivid" mode so the print matches the preview and the card.
- Let the print dry for ten minutes before cutting. Fresh photo prints smudge along a knife edge.
- If the print looks a little darker than the screen, that is normal. Screens are lit; paper is not. The card itself is your reference, not the monitor.
Cutting
You need a straight edge, a sharp blade and patience.
- Craft knife and metal ruler on a self-healing mat gives the cleanest edges. Change the blade after every page or two. A dull blade tears photo paper and lifts the coating.
- Guillotine or rotary trimmer is faster and more consistent for straight cuts, especially on cardstock. Align the guide line to the trimmer's edge and check the first cut against a card.
- Scissors work in a pinch but wander. Cut slightly outside the line and trim back.
Order of cuts
- Cut the long horizontal lines first, so you are handling strips rather than a whole sheet.
- Cut each strip into pieces along the vertical lines.
- Check one piece against a card. If it matches, cut the rest with confidence. If it does not, stop and read the troubleshooting table below.
- Round the corners lightly with a corner punch if you have one. Pockets accept square corners fine, but rounded ones slide in more easily and match the card.
The cutting guide sheet
The second page of your file is the cutting guide, drawn for that page's own grid and laid out for the back: the cut lines are mirrored so they land exactly behind the front's pieces. Print the PDF double-sided, flipped on the long edge, and you cut from the back with no marks on the art. If your printer cannot print double-sided, print page two on its own on the reverse of the sheet, as below. For art printed without its file, the standalone A4 nine-pocket cutting guide does the same job.
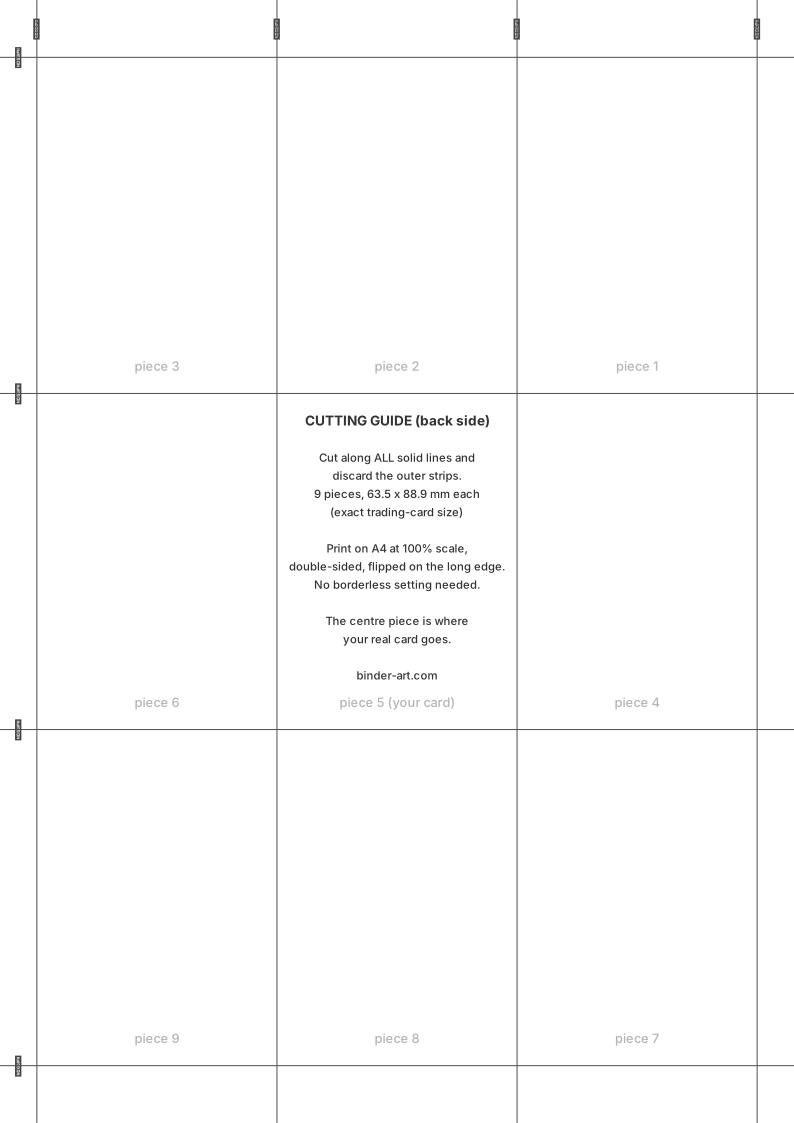
Getting the two sides registered
- Print the front. Let it dry.
- Reload the sheet with the printed side facing the way your printer's manual says for two-sided printing (usually a small icon on the tray).
- Print page two with exactly the same settings as page one: same paper size, 100%, same borderless choice.
- Hold the sheet to a window. The guide lines should sit on the boundaries between pockets. A shift of up to 1 mm is normal and harmless. More than that means the two prints used different scaling or the sheet was loaded off-centre; reprint the guide.
If your printer will not feed photo paper twice, print the guide on plain paper, lay it over the front and cut through both. Less elegant, still accurate.
Into the binder
- Slide each piece in art-side out, working from the corners of the page inward. The open pocket in the middle is for your card.
- Do not sleeve the pieces unless the pocket is loose. Photo paper is already thicker than a card; a sleeve on top can bulge the page.
- If you do want protection, use thin perfect-fit sleeves and drop to 200 gsm paper.
- Keep the binder closed and flat for a day. The pieces settle and any slight curl from the print flattens out.
Troubleshooting
| What you see | Likely cause | Fix |
|---|---|---|
| Pieces are smaller than a card, white gap in the pocket | Fit-to-page or scale-to-fit was on | Reprint at 100% / actual size. Check the scale field reads 100. |
| Pieces are the right size but the scene is shifted between pockets | The page is laid out for a nine-pocket binder | Count the pockets on your real page: nine, in three rows of three, with the card in the middle. |
| Outer pieces have a white strip on one edge | Printer margin, no borderless mode | Normal. Cut inside the strip; the piece is still card size. Or use a borderless printer or a print shop. |
| Whole page is cropped top and bottom | A4 file printed on Letter paper | Print on A4. If you only have Letter, test on plain paper first and expect to lose a sliver of the outer pieces. |
| Colours are washed out | Paper type set to plain | Set the paper type to photo or heavyweight matte and quality to high. |
| Cutting guide does not line up with the front | Different scaling on the two prints, or sheet loaded off-centre | Reprint the guide with identical settings; check the tray guides are snug against the paper. |
| Edges are fuzzy or torn | Dull blade or print not dry | New blade, wait ten minutes after printing. |
| Piece will not slide into the pocket | Paper too thick, or sleeved | Use 200 to 220 gsm, skip the sleeve, round the corners. |
Still stuck? Send a photo of the print next to a card through the contact page and we will work it out with you.